Your jewellery photos
on white
Codex installs the skill from the ZIP, then works through a whole folder of photos: white background, every image checked against the original, and 2K PNGs, PSDs and a review page exported to the folder you choose.
⬇ Download the skill (ZIP, 24 KB)★ Star it on GitHub
Download the ZIP to your computer
The file jewellery-packshot.zip lands in your Downloads folder. No need to unzip it: Codex does that in the next step.
Drop the ZIP into Codex
- Open the ChatGPT app, click ChatGPT at the top left and switch to Codex.
- Drag
jewellery-packshot.zipinto the conversation. - Type “Install this skill” and send.
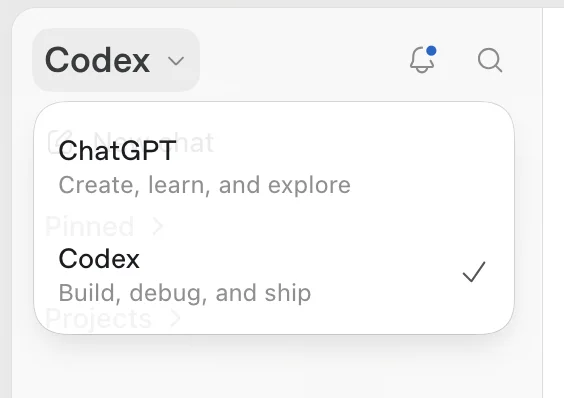
Codex installs the skill and tells you where. The steps are the same on Mac and Windows. If a permission prompt appears, allow it.
Check the install
Read the jewellery-packshot skill, confirm it is ready to use and check that this session can use the built-in image editing tool. Do not retouch anything yet.
If Codex reports a missing file, denied access or an unavailable image tool, ask it to explain the problem and fix it before you start retouching.
Put the photos to retouch in one place
Create a folder for the job, for example Jewellery retouch, and put the original photos in its before subfolder. The after folder next to it receives the results; Codex can create it if it does not exist.
Jewellery retouch/
├── before/    ← original photos
│   ├── ring-01.jpg
│   ├── pendant-02.jpg
│   └── earrings-03.jpg
└── after/     ← Codex results
    ├── PNG/         ← one 2K PNG per photo
    ├── PSD/         ← one two-layer PSD per photo
    └── review.html  ← review page
Copy the full path of the before folder. On Mac: select it in the Finder and press ⌥ ⌘ C. On Windows: hold Shift, right-click the folder and choose “Copy as path”.
| System | Example path |
|---|---|
| Windows | C:\Users\your-name\Pictures\Jewellery retouch\beforeC:\Users\your-name\Pictures\Jewellery retouch\after |
| Mac | /Users/your-name/Pictures/Jewellery retouch/before/Users/your-name/Pictures/Jewellery retouch/after |
Copy this request and add your two paths
Use the jewellery-packshot skill to process a batch of jewellery photos.

Before folder (originals): paste the full path
After folder (results): enter the full path

Process every image in the before folder, ignore hidden system files and keep all originals.
Create the after folder if it does not exist, without overwriting any existing file.
Make the background clean white and keep the natural contact shadow.
Keep the shape, proportions, material, stone count, prongs, texture and camera angle.
When done, tell me how many images passed the check and which ones need review.
This one message is enough: no need to reply “continue” or approve image by image. Codex takes stock of the photos, retouches 2 or 3 representative ones first and checks them, then applies the same standard to the whole folder and exports the results.
How Codex checks each image
- Every result is compared with the original photo, not just the previous version: outline and proportions, number of stones and pearls, stone size within the setting, prongs, chain thickness, filigree, engravings and hallmarks, metal colour.
- If a detail drifts, Codex makes at most one targeted correction. If the defect remains, it stops generating and switches to a masked retouch that keeps the original pixels, adjusting only the background and exposure.
- Each image gets a status:
QC-PASS(check passed),REWORK(defect remains) orBLOCKED(a required tool is unavailable).
To correct one image
Retouch ring-01.jpg again: the metal is too dark, keep the gold of the original photo,
without changing the other details or the framing. Save a new version and keep the previous one.
Open the after folder and start with review.html
Each photo gives PNG/name-after-2k.png and PSD/name-after-2k.psd. The long side is 2048 pixels; if the generated image is smaller, it is upscaled and the page says so: that is not native 2K detail. The PSD has two layers: Original below, After on top.
review.html links each photo to its result and status. For a doubtful image, the page shows the original and the retouch side by side, circles the suspect area and names the problem, for example a stone size, a hallmark or a cutout edge. Codex does not stop to wait for your approval: doubts stay on this page, and an image that failed the check is still exported in its best version, with a note.
The export needs uv, Pillow and psd-tools; Codex checks they are available.
QC-PASS only means Codex saw no clear difference. It does not guarantee a pixel-exact match, exact dimensions or carats, and it does not replace your own approval. Check the stones, prongs and structure yourself before delivery. The skill uses your Codex session’s image editing tool: installing the skill does not enable that tool.Common questions
| Situation | What to do |
|---|---|
| Codex cannot find the ZIP or the before folder | Copy the exact path again, check the file is on the computer and ask Codex to check its access rights. |
| A skill with the same name is already installed | Ask Codex to compare the installed version with the ZIP before updating. |
| The skill cannot be found after installing | In a new message, ask Codex to check the install folder, SKILL.md and the scripts. |
| Codex cannot edit images | Ask it to check that the image editing tool is available in the session, then follow its instructions. |
| The after folder already holds results | Ask for a new subfolder or a new version so earlier deliveries are not overwritten. |
| A stone or shape has changed | Look at the circled area in review.html, then ask for a new retouch checked against the original. If the geometry must stay strictly identical, switch to a classic masked retouch. |
Jewellery Studio
The free edition does white backgrounds. Jewellery Studio adds:
- True size: the piece keeps its real dimensions in every image, from the product photo and its measurements.
- Worn photos: the piece on a model, from the product photo.
- Styled scenes: the piece in a lifestyle or brand setting.
Questions: contact@ykela.com
For companies
Your images must stay in-house? We build a private ComfyUI workflow, installed on your own machines.
See the offer